Snowflake Proxy Guide: Secure Connections Explained 2025
As organizations race to adopt Snowflake in 2025, the stakes for secure data access have never been higher. Growing security threats and compliance demands mean every connection to your data warehouse must be protected. That is where the snowflake proxy comes in.
This guide unpacks how a snowflake proxy empowers you to create secure, reliable connections to Snowflake. Learn how proxies provide robust access control, simplify authentication, and integrate seamlessly with your favorite enterprise tools.
We will walk through snowflake proxy fundamentals, step-by-step setup, connectivity best practices, advanced security, troubleshooting, and key developments for 2025. Ready to safeguard your Snowflake environment? Let us get started.
Understanding Snowflake Proxy: Core Concepts and Benefits
As organizations continue to adopt cloud data platforms, the snowflake proxy has become a foundational component for securing enterprise data. But what exactly is a snowflake proxy, and why is it so vital in 2025? Let's break down the architecture, terminology, and benefits you need to know.
What is a Snowflake Proxy?
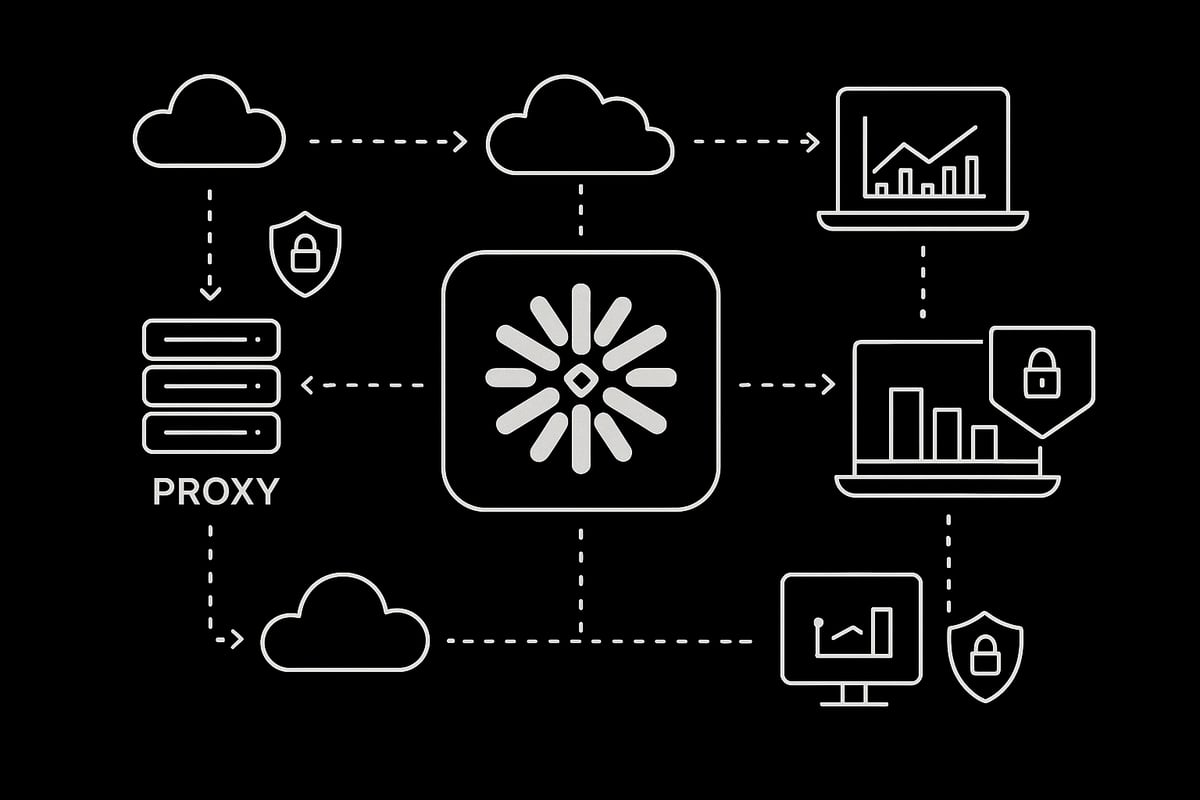
A snowflake proxy acts as an intermediary layer between users, applications, and the Snowflake data warehouse. Instead of connecting directly to Snowflake, clients route traffic through the proxy, which then manages and forwards requests securely.
This setup differs from direct connections, where users or tools interact with Snowflake endpoints without any mediation. By introducing a proxy, organizations can centralize control, enforce security policies, and monitor data access in real time.
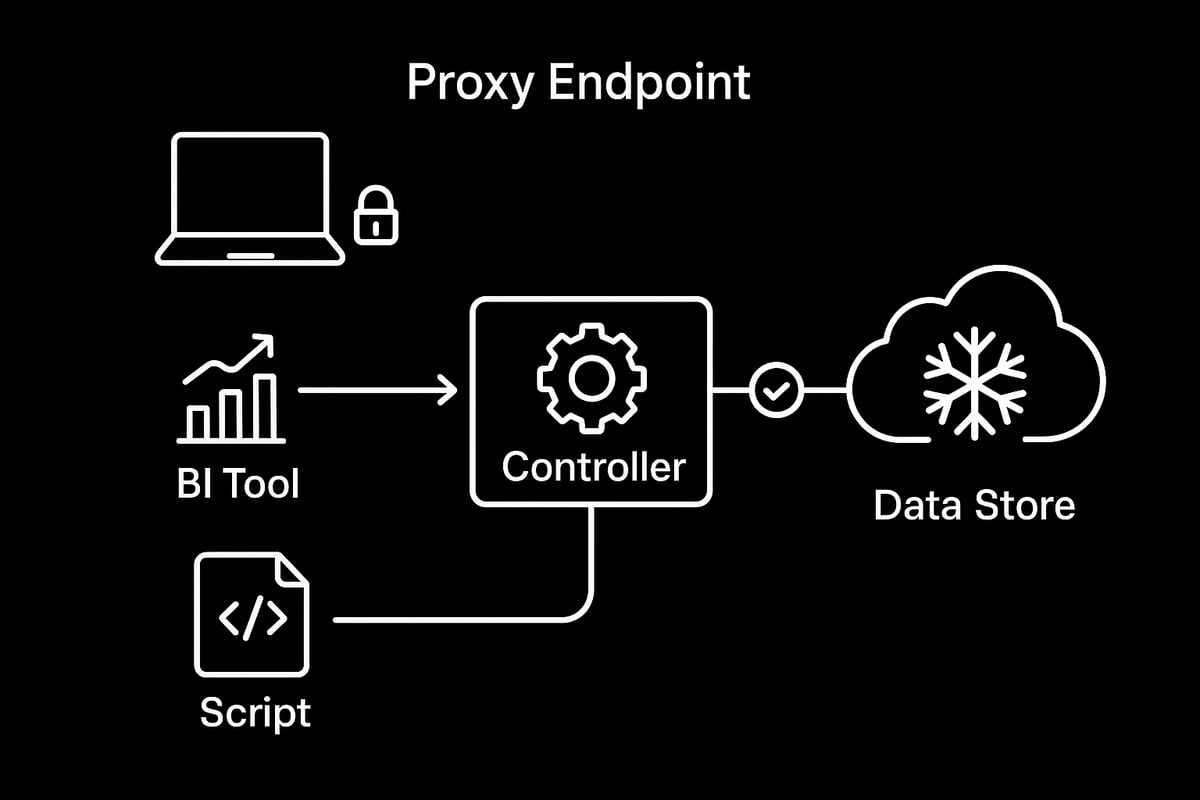
The snowflake proxy architecture includes several key components:
- Data Store: The logical representation of your Snowflake environment within the proxy platform.
- Controller: The proxy engine that inspects, routes, and logs traffic.
- Proxy Endpoint: The unique hostname clients use to access Snowflake via the proxy.
Proxies serve multiple use cases. They help with security by inspecting traffic, enable compliance by logging every query, and offer network segmentation by isolating sensitive environments. For example, a team might use a proxy to enforce strict access controls on sensitive financial data, ensuring only authorized analysts can connect.
Satori’s integration with Snowflake is a practical example of this architecture. By adding Snowflake as a data store in Satori, organizations can quickly set up policy enforcement, granular access controls, and activity logging without changing their underlying Snowflake configuration.
In 2025, adoption of proxy-based access is accelerating, especially as enterprises move toward zero-trust security models. This trend is driven by rising regulatory demands and the need for advanced segmentation.
To better understand the technology behind proxy management and setup, you can explore this helpful Proxy server software guide, which provides additional context on how proxies operate in modern data environments.
Key Benefits of Using a Snowflake Proxy
The snowflake proxy delivers several critical benefits for data-driven organizations.
Centralized Access Control: Instead of managing permissions across dozens of tools, teams use the proxy to enforce policies in one place.
Enhanced Security: Proxies inspect all traffic and can mask sensitive data fields before they ever reach the user.
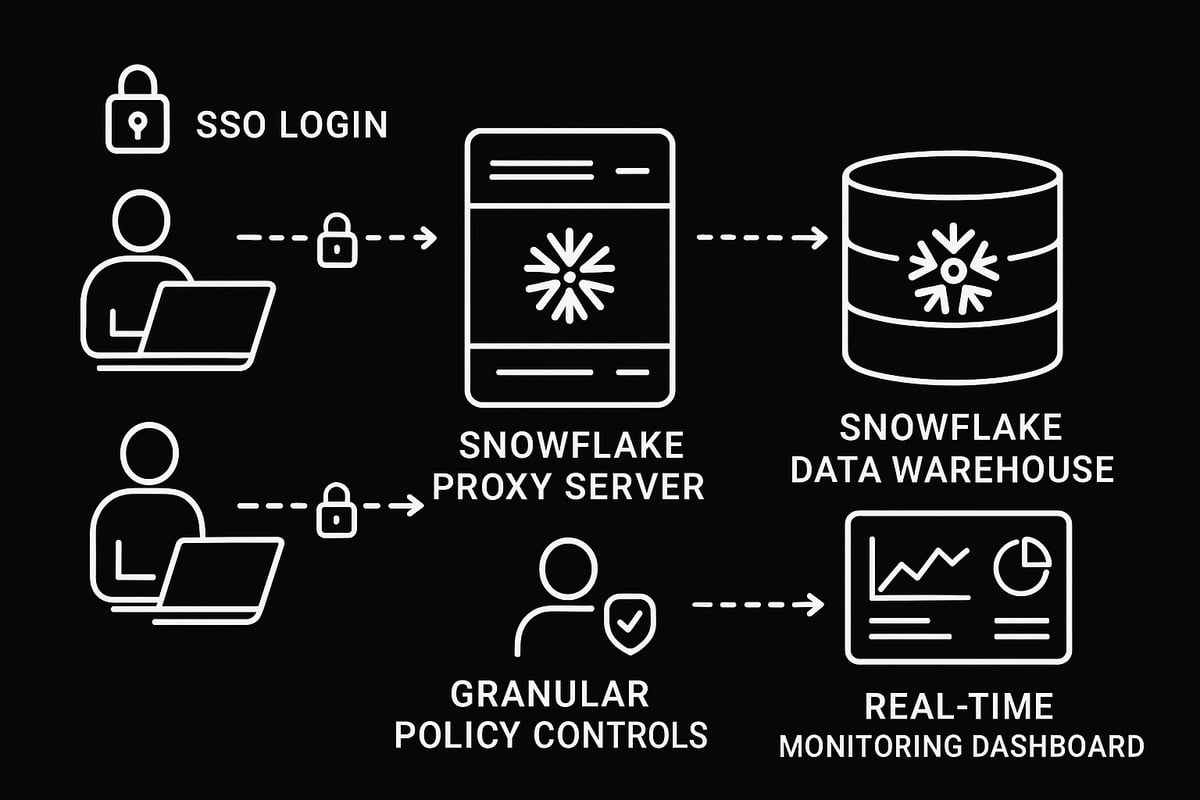
SSO and Identity Provider Integration: The snowflake proxy easily connects with single sign-on platforms, streamlining authentication for large teams.
Auditing and Compliance: Every query and login is logged, making it easier to produce audit trails for regulatory reviews.
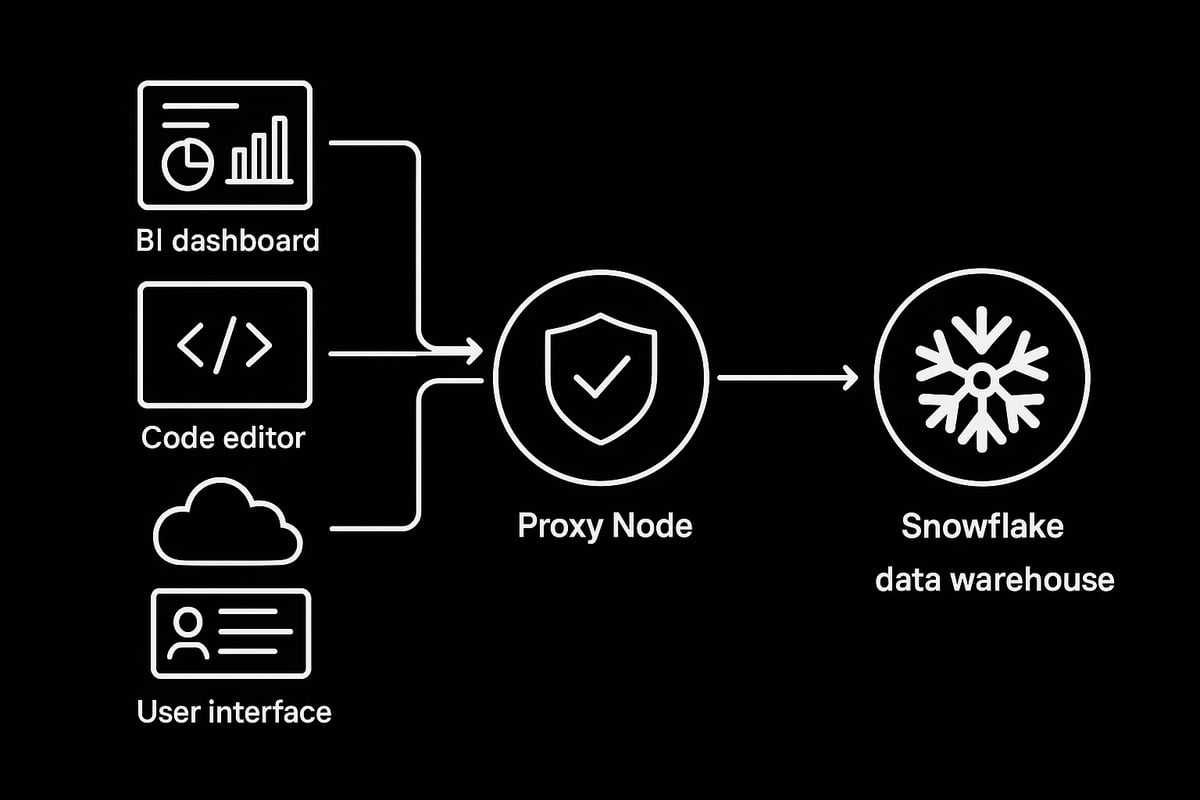
Flexible Connectivity: Whether you use BI dashboards, command-line tools, or custom scripts, the proxy provides a single, consistent access point.
Here’s a table summarizing key benefits:
| Benefit | Description |
|---|---|
| Centralized Access Control | Unified policy enforcement across users and tools |
| Security & Data Masking | Inspect, block, or mask sensitive data in transit |
| SSO Integration | Seamless authentication via identity providers |
| Comprehensive Auditing | Detailed logs for compliance and monitoring |
| Flexible Connectivity | Supports BI, CLI, scripts, and custom apps |
According to an industry survey in 2024, over 70% of regulated organizations now rely on proxy-based Snowflake access. This shift reflects the growing need for robust, auditable, and manageable security.
For example, with a snowflake proxy, you can grant an analyst access only to specific schemas or columns, while blocking all others. This level of granularity is nearly impossible to achieve with direct connections alone.
As enterprise data landscapes evolve, the snowflake proxy stands out as a critical enabler for secure, compliant, and efficient data operations.
Step-by-Step: Setting Up a Secure Snowflake Proxy Connection
Setting up a secure snowflake proxy connection is a critical process for any data-driven organization prioritizing security and compliance. In this section, we’ll walk through each step, from initial planning to successful connection testing, ensuring that your snowflake proxy deployment is both robust and future-proof.
Prerequisites and Planning
Before diving into configuration, it’s essential to gather all prerequisites for your snowflake proxy setup. Proper planning ensures a smooth deployment and reduces the risk of connectivity issues down the line.
Checklist of Requirements:
| Prerequisite | Description |
|---|---|
| Snowflake Account | Access credentials and account hostname |
| Proxy Management Console | Admin access (e.g., Satori) |
| Cloud Provider & Region | AWS, Azure, or GCP details |
| Network/Firewall Access | Ability to update rules and allow traffic |
Start by identifying your Snowflake account hostname, typically in the format xyz123.snowflakecomputing.com. Confirm your public cloud provider and region for optimal latency and compliance.
Next, ensure you have admin access to your chosen proxy management console, such as Satori. Verify that your network team can implement required firewall rules and connectivity settings. Document all details for reference during the snowflake proxy setup.
Adding a Snowflake Proxy Data Store
With planning complete, you’re ready to add your Snowflake data store to the proxy management console. This process establishes the link between your snowflake proxy and the Snowflake environment.
Step-by-Step Setup:
- Log in to your proxy management console.
- Navigate to the "Data Stores" section, then select "Add Data Store."
- Choose "Snowflake" as the data store type.
- Enter a descriptive name for the data store to easily identify its purpose.
- Input your Snowflake hostname and confirm the correct region.
- Select your public cloud provider (AWS, Azure, or GCP).
- Complete the setup and verify the new data store appears in your list.
Tips:
- Use clear naming conventions like
finance-prod-snowflakeproxyfor easy management. - Document each step and configuration for auditing and troubleshooting.
By following these steps, your snowflake proxy will be ready to mediate secure connections between clients and your Snowflake data warehouse.
Allowing Connectivity Between Proxy and Snowflake
Connectivity is at the heart of a reliable snowflake proxy configuration. The proxy controller must reach all necessary Snowflake endpoints, so network policies and firewall rules need careful attention.
Network Configuration Steps:
- Ensure the proxy controller’s IP addresses are whitelisted in your firewall.
- Open required ports, typically TCP 443, for encrypted connections.
- Map your Snowflake region to the nearest proxy deployment region for optimal performance.
- For cloud-specific guidance, consult your provider’s documentation (AWS, Azure, or GCP).
If you need a deep dive into best practices for proxy network setup, Proxy network configuration tips offers practical guidance tailored for enterprise environments.
Common Pitfalls:
- Overlooking outbound rules for the proxy controller.
- Misconfigured NAT or VPN settings blocking Snowflake access.
- Failing to monitor latency between proxy and Snowflake endpoints.
A well-configured network is crucial for the snowflake proxy to function securely and efficiently.
Verifying and Testing the Connection
Once configuration is complete, it’s time to verify your snowflake proxy connection. Testing ensures that authentication, access, and data flows work as expected before rolling out to production users.
Testing Checklist:
- Use the proxy-generated hostname in your Snowflake connection tools.
- Authenticate using your usual credentials or SSO, depending on your setup.
- Validate connectivity with tools like SnowSQL, the Snowflake CLI, or supported BI clients.
Example: Testing with SnowSQL
snowsql -a proxy-hostname -u myuser -r myrole
For Python scripts, adjust your connection parameters to use the proxy endpoint:
import snowflake.connector
conn = snowflake.connector.connect(
    user='myuser',
    password='mypassword',
    account='proxy-hostname'
)
Check for successful login and data access. If issues arise, revisit your snowflake proxy and network settings for possible misconfigurations.
With these steps, your snowflake proxy connection is now secure, validated, and ready for enterprise workloads.
Secure Authentication, Access Control, and SSO Integration
Modern data teams require airtight security and seamless user experience. The snowflake proxy acts as a central gatekeeper, enforcing authentication, granular access, and enterprise-grade SSO. Let’s explore how these capabilities work together to strengthen your Snowflake environment.
Leveraging Snowflake Native Access Controls with Proxy
Role-based access control (RBAC) is foundational for Snowflake security. With RBAC, you assign users to roles, then grant those roles permissions on objects like databases, schemas, or warehouses. The snowflake proxy builds on this by centrally enforcing these policies, ensuring users only access what they’re authorized for.
When users connect via a snowflake proxy, all access requests are evaluated against both native Snowflake RBAC and additional proxy-layer rules. This enables enterprises to implement more granular policies, such as temporary access, geo-restrictions, or approval workflows, without modifying Snowflake roles directly.
Integrating the snowflake proxy with Snowflake’s user and role management streamlines onboarding and offboarding. For example, you can grant marketing analysts access to a specific schema while restricting finance data, all managed through the proxy console. This approach reduces risk and simplifies compliance audits.
SAML-based Single Sign-On (SSO) with Proxy
Single Sign-On (SSO) streamlines authentication, letting users access Snowflake with their corporate credentials. The snowflake proxy supports SAML-based SSO, integrating with popular identity providers like Okta, OneLogin, and Microsoft Entra ID. This ensures strong authentication and a frictionless user experience.
With SAML SSO, when a user attempts to log in through the snowflake proxy, the proxy redirects them to the identity provider for authentication. Once verified, the user is granted access to Snowflake resources according to their assigned roles and policies.
Enabling SAML SSO in your proxy management console is straightforward. You configure the proxy with your identity provider’s SAML metadata, map user attributes to Snowflake roles, and test the integration. For a detailed walkthrough, see the SAML-based Single Sign-On for Snowflake guide, which covers setup steps and advanced scenarios. This integration is crucial for organizations aiming to unify credentials and enforce enterprise security standards with the snowflake proxy.
Advanced Policy Enforcement and Masking
Beyond authentication and role assignments, the snowflake proxy unlocks powerful security controls like dynamic data masking and row-level security. These features allow you to define who can see sensitive fields or specific data rows, based on user identity or context.
Custom security policies can be created in the proxy management console. For instance, you might redact personally identifiable information (PII) for analysts, while allowing full access for compliance officers. The snowflake proxy can also enforce regulatory controls such as GDPR or HIPAA, logging all access attempts for auditability.
Monitoring and auditing are integral to maintaining compliance. The snowflake proxy captures detailed activity logs, which can be integrated with SIEM tools for real-time alerts and reporting. This layered approach ensures that only authorized users access sensitive data, and every action is tracked for accountability.
Connecting Applications and BI Tools via Proxy
Connecting your favorite applications and BI tools through a snowflake proxy unlocks advanced security and enables seamless data access across your organization. Whether you use web interfaces, programming languages, or analytics platforms, proper configuration ensures you benefit from controlled, auditable connectivity.
Connecting with Snowflake Classic UI and Snowsight
Accessing Snowflake via the Classic UI or Snowsight is straightforward with a snowflake proxy. Start by updating your connection settings to use the proxy-generated hostname instead of your direct Snowflake account endpoint.
For username and password authentication, simply enter your credentials as usual. If your organization uses Single Sign-On, the snowflake proxy can route SSO traffic, letting you log in with your enterprise identity provider.
Switching between Classic UI and Snowsight is seamless. Both interfaces support proxy connections, so you can move between them without additional setup. Always verify your session reflects the correct permissions enforced by the snowflake proxy, especially if your organization uses granular access policies.
If you encounter login issues, confirm your proxy hostname is correct and your browser or network allows outbound connections to the proxy endpoint. Testing access from different browsers or devices can help isolate problems.
Connecting from Command-Line Tools and Programming Languages
Using command-line tools and programming languages with a snowflake proxy involves a few simple adjustments. For SnowSQL, set the --host parameter to the proxy endpoint. This small change routes all traffic through the proxy, activating policy enforcement and logging.
Here’s a sample SnowSQL command:
snowsql -a <proxy_hostname> -u <username>
For Python, update your connection logic to reference the proxy host:
import snowflake.connector

conn = snowflake.connector.connect(
    user='your_username',
    password='your_password',
    account='proxy_hostname'
)
Other connectors, such as JDBC or ODBC, require you to override the server or host parameter with the snowflake proxy hostname. This approach works for Java, .NET, and other environments.
If you experience authentication failures or connectivity errors, double-check your host string and network rules. Proxy-specific issues often relate to firewall settings or misconfigured endpoints.
Integrating BI and Analytics Platforms
BI and analytics platforms like Tableau, Power BI, Looker, and Sigma can all connect through a snowflake proxy. The process typically involves updating the data source configuration to point to the proxy hostname, ensuring all queries and user actions are logged and controlled.
For Tableau, set the ODBC driver’s server field to the proxy endpoint, then authenticate with your usual credentials or via OAuth. Power BI Desktop users should update the server address in the connection dialog. Most modern BI tools support proxy connections natively, but always verify that row-level security and auditing remain functional when routed through the snowflake proxy.
Here’s a quick table summarizing connection parameters:
| Tool | Host/Server Field | Authentication |
|---|---|---|
| Tableau | Proxy hostname | Username/OAuth |
| Power BI | Proxy hostname | Username/SSO |
| Looker | Proxy hostname | Service account/SSO |
If your analytics platform supports OAuth or SSO, ensure your proxy is configured to relay identity tokens and enforce session policies. This setup provides end-to-end governance and visibility over all BI activity.
Advanced Security, Network Policy, and Limitations
Securing your Snowflake proxy environment requires a thoughtful blend of robust policies, awareness of system limitations, and a proactive approach to compliance. As organizations rely more heavily on Snowflake proxy configurations in 2025, understanding advanced security practices and staying alert to platform changes is crucial.
Network Policy Settings and Best Practices
Configuring effective network policies is foundational to maximizing Snowflake proxy security. With proxies, you can control access with remarkable precision, restricting connections to specific IP ranges, device types, or geographies.
Common Policy Options Comparison
| Policy Type | Description | Use Case |
|---|---|---|
| IP Whitelisting | Allow only trusted IP addresses | Office networks, VPNs |
| Geo Restriction | Permit regions or countries | Compliance, data residency |
| Device Enforcement | Limit by device certificate or fingerprint | Corporate devices only |
| Time-based Access | Schedule when access is allowed | After-hours protection |
Best practices for Snowflake proxy network policies include:
- Regularly auditing allowed IPs and regions
- Automating policy enforcement using proxy management tools
- Documenting all rule changes for traceability
Advanced features like rotating proxy endpoints can add another layer of defense, making it harder for attackers to target static IPs. To see how rotation enhances security, explore rotating proxy advanced features.
Misconfigurations, such as overly broad IP allowances or missing documentation, are common pitfalls. Always test your policy changes in a staging environment before rolling out to production.
Handling Known Limitations and Edge Cases
While the Snowflake proxy unlocks broad compatibility, some edge cases and limitations remain. Not all tools or workflows support every proxy feature natively.
Notable limitations include:
- Incomplete support for Python worksheets or Streamlit apps within the Snowflake UI
- Occasional incompatibilities with certain JDBC/ODBC authentication flows
- Differences between Tableau Cloud and Tableau Server proxy integration
For example, when connecting Tableau Cloud, you may need to adjust OAuth flows or use alternate service accounts, while Tableau Server allows more direct configuration.
To address unsupported features:
- Review vendor documentation for updates
- Seek community workarounds for niche use cases
- Test BI and application tools in a sandbox before wide deployment
Staying aware of these nuances ensures your Snowflake proxy rollout is resilient and flexible.
Monitoring, Auditing, and Compliance
Comprehensive monitoring and auditing are essential for regulated industries and security-conscious teams. The Snowflake proxy simplifies this process by centralizing activity logs and enabling detailed user tracking.
Setting up audit logs typically involves:
CREATE OR REPLACE TABLE PROXY_AUDIT_LOGS AS
SELECT * FROM INFORMATION_SCHEMA.LOGIN_HISTORY
WHERE CLIENT_TYPE = 'PROXY';
Integrating with SIEM platforms allows security teams to correlate Snowflake proxy events with broader organizational alerts. Compliance reporting becomes more straightforward, as logs can be filtered by user, time, or activity type.
For regulatory audits, generate periodic reports and retain logs according to your industry’s data retention policies. This proactive approach ensures you’re always prepared for compliance checks.
Staying Updated: New Developments in 2025
The Snowflake proxy landscape evolves rapidly. In 2025, expect broader BI tool integrations, enhanced MFA requirements, and more cloud-native proxy enhancements.
Key trends include:
- Greater adoption of zero-trust architectures
- AI-based anomaly detection for proxy traffic
- Seamless integration with evolving identity providers
To keep your Snowflake proxy secure and effective, regularly consult vendor documentation, join community forums, and review release notes. For a deep dive into evolving security and IAM strategies, see Snowflake Security and Identity & Access Management.
Continuous learning and adaptation are vital for future-proofing your Snowflake proxy strategy.
Troubleshooting and Optimizing Snowflake Proxy Connections
Running into issues with your snowflake proxy setup can be frustrating, but most problems have straightforward solutions when you know where to look. Whether you are facing connection errors, slow performance, or unexpected authentication failures, this section will help you troubleshoot and optimize your environment with confidence.
Common Connection Issues and Error Messages
Connection issues are among the most frequent challenges when working with a snowflake proxy. Typical problems include authentication failures, network timeouts, and connectivity errors between the proxy controller and Snowflake endpoints.
Some common error messages you may encounter are:
- "A task was canceled" (especially with the .NET connector)
- "Failed to authenticate" due to misconfigured credentials or expired tokens
- "Network timeout" if firewall rules or ports are not correctly set
To diagnose, start by confirming your proxy endpoint, credentials, and network path. Use tools like snowsql or Python connectors to isolate whether the issue is with the snowflake proxy, your local network, or Snowflake itself.
Performance Tuning and Best Practices
Optimizing your snowflake proxy is essential for balancing security and speed, especially under heavy query loads. Start by reviewing your proxy's throughput capacity and ensure your infrastructure can handle peak data volumes.
Consider these performance tuning tips:
- Monitor bandwidth usage and adjust policies to avoid bottlenecks
- Limit proxy rotation frequency to reduce query latency
- Use the closest available proxy region to minimize round-trip time
| Tuning Area | Best Practice |
|---|---|
| Bandwidth | Monitor and scale up as needed |
| Proxy Rotation | Keep intervals reasonable |
| Firewall Rules | Only allow required ports/IPs |
Regularly review your snowflake proxy logs for slow queries or repeated errors, which can signal underlying performance issues.
Support Resources and Community Guidance
When troubleshooting snowflake proxy issues, leverage official documentation, vendor support, and online communities. The Troubleshooting proxy issues guide offers step-by-step solutions for common proxy errors, including connectivity checks and configuration fixes.
You can also find answers on Stack Overflow and vendor-specific forums. Participate in Q&A threads or search for previously resolved cases. Keep your proxy management console and Snowflake documentation handy for quick reference during investigations.
Real-World Scenarios and Case Studies
Learning from real-world deployments can help you avoid common pitfalls with your snowflake proxy. Many organizations have improved security and reliability by following best practices for network segmentation, access control, and monitoring.
For example, a global finance team resolved persistent authentication errors by standardizing on SAML SSO through their proxy and automating firewall updates. Another enterprise reduced query latency by optimizing their proxy region mapping and bandwidth allocation.
By studying these scenarios, you can fine-tune your snowflake proxy strategy and ensure your data access remains secure, fast, and resilient.Now that you’ve explored the essentials of securing your Snowflake connections with modern proxy solutions, you know just how important privacy, speed, and reliability are - especially with the rise of zero trust architectures and global data regulations. If you’re ready to put these best practices into action and want high speed proxies with features like 1ms rotation, unlimited access, and full IPv4 IPv6 support, we’ve got the tools to help you stay ahead. Take the first step toward safer, smarter Snowflake integration - Get Started Now.